10 Easy Nail Art Designs for Beginners

Welcome to the colorful world of nail art! Whether you’re a complete beginner or just looking for some fresh ideas, we’ve got you covered. Nail art is a fantastic way to express your creativity and add a touch of glamour to your fingertips. From simple stripes to intricate floral designs, there are endless possibilities when it comes to creating beautiful nail art designs. In this blog post, we’ll walk you through 10 easy nail art designs that are perfect for beginners. So grab your polish and let’s get started on this fun and fabulous journey into the world of nail art!
What You’ll Need: Nail art designs
So, you’ve decided to dive into the captivating world of nail art? Great choice! Before we begin exploring the various designs, let’s make sure you have everything you need to create stunning manicures.
First and foremost, a good quality base coat is essential. This will not only protect your nails from staining but also ensure that your nail polish adheres smoothly and lasts longer. Invest in a reliable top coat as well, which will seal in your design and give it that coveted glossy finish.
Next up, stock up on a range of vibrant nail polishes in different shades. From bold reds to pastel pinks, having an array of colors at your disposal will allow for endless creativity. Don’t forget to grab some white polish too – it’s perfect for creating crisp lines and intricate details.
To bring your designs to life, consider investing in some tools such as dotting tools or toothpicks for creating dots or small details. A thin striping brush can come in handy for precise lines or stripes while tape or guides can assist with achieving clean geometric shapes like chevrons.
Don’t forget about cleanup! Having a bottle of acetone or nail polish remover plus cotton pads or Q-tips nearby will help keep things neat and tidy.
Now that you’re equipped with all the necessary supplies let’s jump into these easy nail art designs that are perfect for beginners! Get ready to unleash your inner artist onto those lovely canvases known as nails.
Simple Stripes: Nail art designs
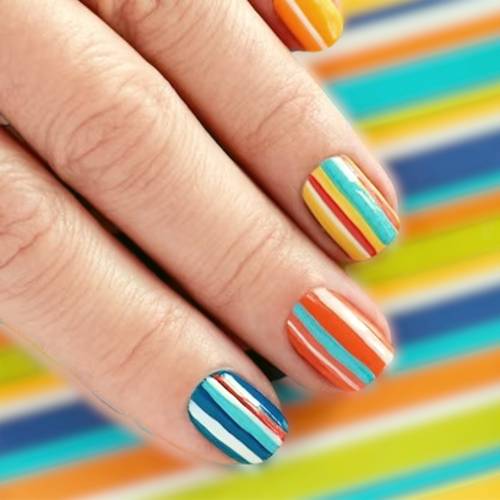
When it comes to nail art designs for beginners, simple stripes are a go-to option. They are easy to create and add a touch of elegance to your nails. To achieve this look, you will need a few basic tools: striping tape or nail art brushes, a base color polish, and contrasting colors for the stripes.
Start by applying your chosen base color and allow it to dry completely. Once dry, cut small pieces of striping tape and place them on your nails diagonally or horizontally, depending on the desired stripe direction. Make sure the tape is firmly pressed down to prevent any bleeding.
Now it’s time to add the contrasting colors! Use a thin brush or striping tool dipped in your chosen color(s) to carefully paint over the exposed areas between the tape lines. Be patient and take your time; precision is key here.
Once you’ve painted all the stripes, wait for them to dry before gently removing the striping tape with tweezers. Apply a top coat for more shine and protection.
Stripes can be as simple or intricate as you like – experiment with different widths and color combinations to find what suits you best. So why not give this classic design a try? You’ll be surprised at how chic and effortless it looks!
Remember that practice makes perfect when it comes to nail art designs. Don’t worry if your first attempt isn’t flawless – embrace imperfections as part of your artistic journey! Happy painting!
Dots: Nail art designs
Dots are a classic and versatile nail art design that is perfect for beginners. With just a few simple tools, you can create endless possibilities with dots on your nails.
To start, gather your supplies: a dotting tool or bobby pin, different colored nail polishes of your choice, and a base coat to protect your nails. Once you’ve gathered all of your materials, it’s time to get creative!
Start by applying the base coat to ensure that your nail art lasts longer. Once dry, choose one color as the base and apply it evenly across all of your nails. Allow it to dry completely before proceeding.
Now comes the fun part – adding the dots! Dip the tip of your dotting tool or bobby pin into another color polish and gently touch it onto your nail surface to create small dots. You can experiment with different sizes and spacing to achieve various looks.
For an extra pop of creativity, try mixing colors or creating patterns with multiple dots. Play around with contrasting colors or even try gradient effects using different shades in the same color family.
Remember to let each layer dry before adding another dot or changing colors to avoid smudging. Apply a top coat for more shine and protection.
With just a little practice and patience, you’ll be able to master this beginner-friendly nail art design in no time! So go ahead, grab those polishes, and start creating beautiful dotted designs on your nails today!
Half Moon: Nail art designs
The Half Moon nail art design is a classic and sophisticated look that is perfect for beginners. This style involves creating a half-moon shape at the base of your nails, leaving the rest of the nails bare or adding another contrasting color.
To achieve this elegant look, you’ll need a few tools: nail polish in two different shades, reinforcement stickers or hole reinforcers, and a top coat to seal it all in.
Start by applying one color as your base coat and allow it to dry completely. Then place the reinforcement sticker at the base of your nail, leaving only the desired amount of space for the half moon. Apply the second color over the sticker and let it dry before carefully removing the sticker.
You can get creative with this design by using complementary colors or even adding some glitter or metallic accents to make it pop. The possibilities are endless!
With practice and patience, you’ll soon master this timeless Half Moon nail art design. It’s a simple yet sophisticated way to elevate any manicure and add a touch of elegance to your overall look. So, why not give it a shot?
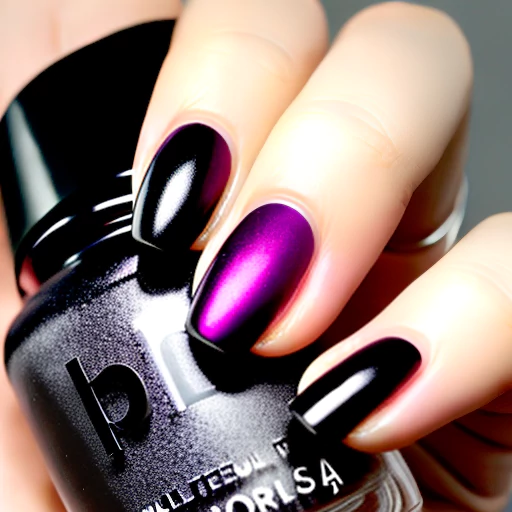
Glitter Ombré: Nail art designs
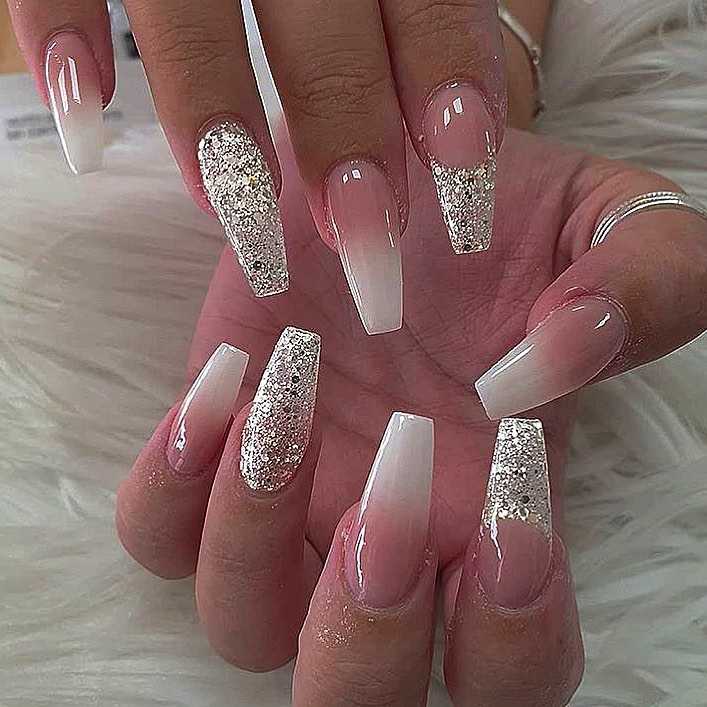
Glitter Ombré is a trendy and glamorous nail art design that adds a touch of sparkle to your fingertips. It’s the perfect way to elevate your manicure game and make a statement with your nails.
To achieve the Glitter Ombré look, you’ll need a few key supplies. Start with a base coat to protect your natural nails, then choose two complementary nail polish colors – one for the ombré effect and another for the glitter accent. You’ll also need some loose glitter or glitter nail polish, as well as a makeup sponge for blending.
First, apply your base color all over your nails and let it dry completely. Then, take the makeup sponge and paint alternating stripes of each color onto it. Gently press the sponge onto your nails in a rolling motion, starting at the cuticle area and working toward the tips. This will create an effortless gradient effect.
Once you’re satisfied with the ombré blend, add some extra pizzazz by applying glitter either on top of the entire nail or just along the tips for added drama. The result? A stunning combination of shimmering colors that will catch everyone’s eye.
Glitter Ombré is versatile too! You can experiment with different color combinations depending on your mood or occasion. Whether you opt for bold and vibrant shades or subtle pastels, this design is sure to make heads turn wherever you go.
So why not give Glitter Ombré a try? It may seem intimidating at first, but with practice and patience, you’ll be able to master this dazzling nail art technique in no time. Prepare to shine brighter than ever before!
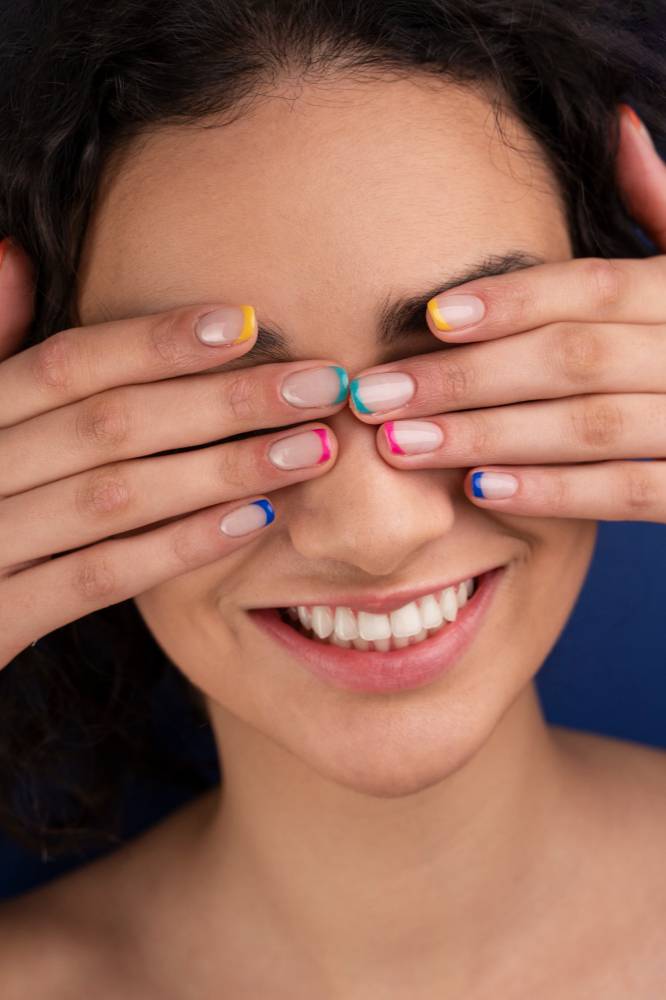
Two-Tone Tips: Nail art designs
Looking to add a little pop of color to your nails? Two-tone tips are the perfect way to experiment with different shades and create a fun, eye-catching manicure. This simple nail art design is great for beginners because it doesn’t require any intricate details or fancy tools. All you need are two complementary nail polishes and some tape.
Start by applying a base coat to protect your nails and ensure that your manicure lasts longer. Once the base coat is dry, choose two colors that you want to use for the two-tone effect. You can go bold with contrasting shades or keep it more subtle with similar hues.
Next, take some striping tape or regular scotch tape and cut thin strips. Place them diagonally across each nail, leaving just the tips exposed. Make sure the tape is firmly pressed down so that there’s no bleeding or polish underneath.
Now comes the fun part – painting! Use one of your chosen colors to paint over the entire nail, including the exposed tip. Allow this layer to dry completely before carefully peeling off the tape strips.
Once you’ve removed all of the tape, take your second color and paint just on top of the exposed tip area. This creates a striking contrast between both shades.
Finish off with a high-shine top coat for added durability and shine, and voila! You now have stylish two-tone tips that will surely turn heads wherever you go!
Experiment with different color combinations and get creative with patterns if you feel adventurous! The possibilities are endless when it comes to two-tone tips – whether you opt for pastels in springtime or rich jewel tones during the fall/winter seasons.
Give yourself permission to play around with various colors until you find your favorite combination. Remember, practice makes perfect – don’t be afraid to try again if your first attempt doesn’t turn out exactly as expected.
So why not give two-tone tips a try? It’s an easy nail art design that allows you to showcase your personal style and
Chevron: Nail art designs
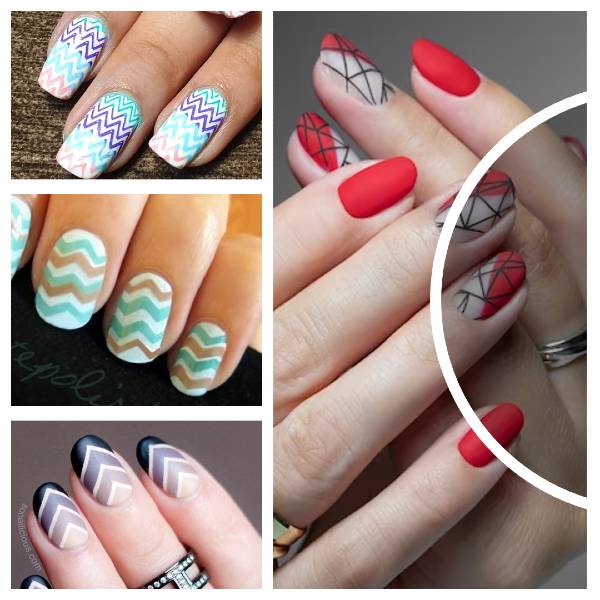
Chevron is a classic and versatile nail art design that adds a touch of sophistication to any manicure. With its simple yet striking V-shaped pattern, it’s perfect for beginners who are looking to experiment with different designs. To achieve the chevron look, you’ll need two contrasting nail polish colors and some striping tape.
Start by applying your base color and allowing it to dry completely. Once dry, cut small strips of striping tape and place them diagonally across your nails in a zigzag pattern, creating the chevron shape. Make sure the edges of the tape adhere firmly to your nails.
Next, apply your second color over the entire nail, including over the taped areas. This will create a layered effect once you remove the tape. Carefully peel off the striping tape while the polish is still wet for clean lines.
Finish off with a top coat to seal in your design and add shine. The result? A chic and trendy chevron manicure that will have heads turning!
Experiment with different color combinations or even add some glitter for extra pizzazz! Chevron nails are not only easy to do but also incredibly stylish – making them a go-to choice for any occasion! So why not give this timeless nail art design a try? You’ll be amazed at how professional-looking yet effortless it can be!
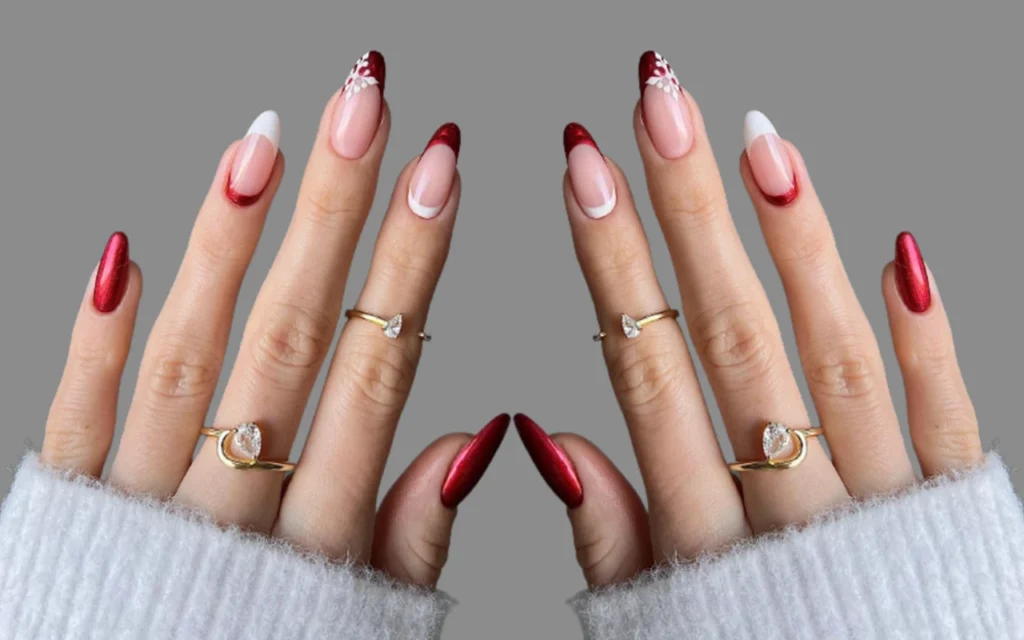
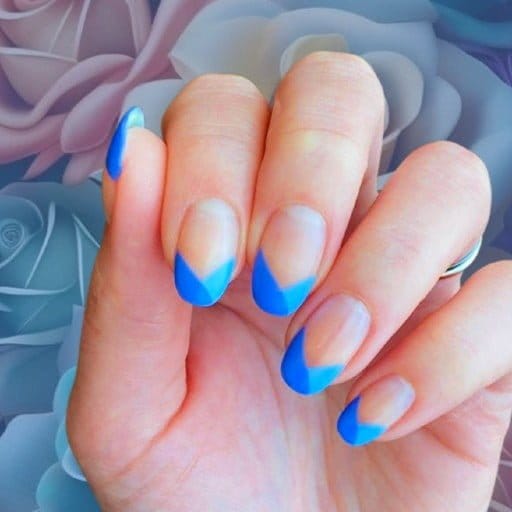
Floral French Tip: Nail art designs

Floral French Tip is a charming and delicate nail art design that adds a touch of elegance to your fingertips. It combines the classic French manicure with beautiful floral patterns, creating a unique and feminine look.
To achieve this design, start by applying a base coat to protect your nails. Then, using a thin brush or dotting tool, create the French tip by painting the ends of your nails with a light-colored polish. You can choose traditional white or get creative with pastels or metallic shades.
Once the French tip has dried, it’s time to add the floral details. Dip your brush in another color of polish and carefully draw small flowers at the base of each nail. You can vary the size and shape of the flowers for added visual interest.
To complete the look, add some leaves or vines around the flowers using green polish. Remember to let each layer dry before moving on to avoid smudging.
The Floral French Tip design is versatile and can be customized according to your preferences. Experiment with different colors, and flower shapes, and even add glitter accents for an extra sparkle!
Whether you’re attending a wedding or simply want to elevate your everyday style, Floral French Tip is an easy yet stunning nail art design that will make heads turn wherever you go!
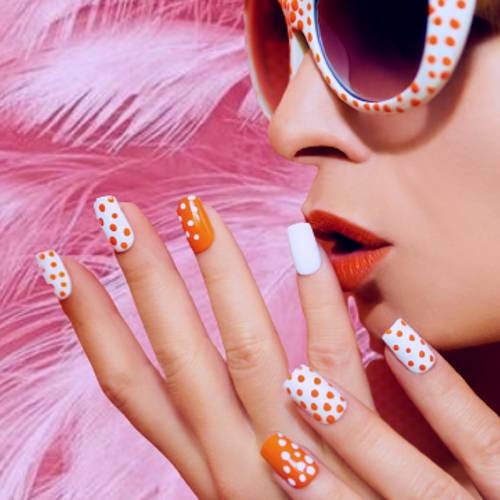
Polka Dots: Nail art designs
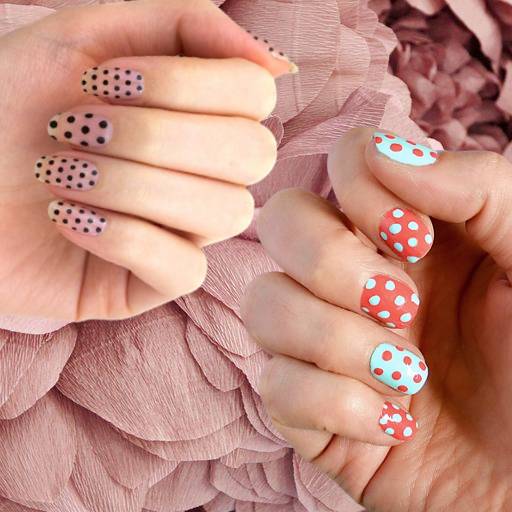
Polka Dots are a timeless and adaptable nail painting style that is ideal for novices. This simple pattern adds a playful touch to any manicure and can be customized in various colors and sizes. Whether you’re going for a subtle look or want to make a bold statement, polka dots are the way to go!
To create polka dot nails, start by applying a base coat and allowing it to dry completely. Then, take a toothpick or dotting tool dipped in your chosen nail polish color and gently press it onto your nails. You can create small dots for a delicate look or larger ones for more impact.
For an extra creative twist, try experimenting with different color combinations. You can use contrasting shades like black and white for a classic monochrome look, or opt for complementary colors like blue and yellow for added vibrancy.
If you’re feeling adventurous, why not mix up the size of the polka dots? Alternate between large and small dots on each nail or create asymmetrical patterns for an edgier effect.
The best part about polka dot nails is that they don’t have to be perfect! The beauty of this design lies in its simplicity, so embrace imperfections as part of the charm.
With just a few simple steps, you can achieve fun and stylish polka-dot nails that are sure to turn heads wherever you go. So grab your favorite nail polish shades and get ready to unleash your creativity with this timeless nail art design!
Leopard Print: Nail art designs
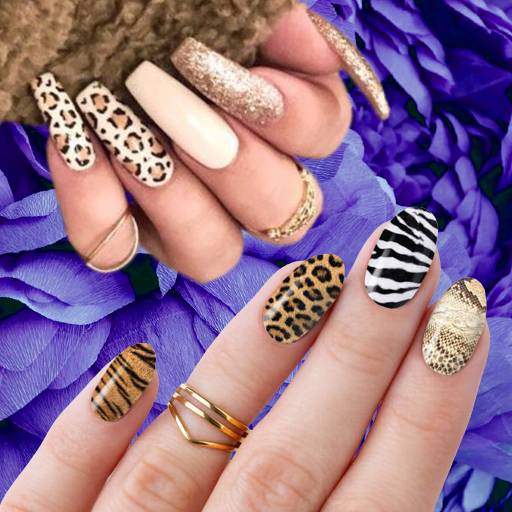
Leopard print is a classic and bold nail art design that adds a touch of wildness to your nails. It’s perfect for those who want to make a statement and show off their fierce side. To achieve this look, you’ll need a base color in either neutral tones like beige or brown, or go bold with black.
Start by applying your chosen base color and letting it dry completely. Next, use a thin brush or dotting tool to create irregular spots on your nails using black or dark brown polish. The key here is not to worry about making the spots perfectly symmetrical – embrace the natural pattern of leopard print!
Once you’ve created the spots, take another shade such as gold or bronze, and add smaller dots within some of the larger spots for added dimension. You can also experiment with different colors for an unexpected twist.
To complete the leopard print design, outline some of the larger spots with black polish to give them a definition. Finish off with a glossy top coat to seal in your design and add shine.
Leopard print nail art is versatile and can be customized in various ways. Try experimenting with different colors, adding glitter accents, or even incorporating other animal prints into your design for an extra edge.
So unleash your inner wildcat and give leopard print nail art a try – it’s sure to turn heads wherever you go!